Introduction: The Economy of Arrakis
Every survival MMO has its resource grind, but Dune: Awakening turns it into a narrative of personal growth. You start with copper knives and cloth rags, eventually ending up with plasteel weapons and ornithopters. The game’s tiered regions gate resources in a “hero’s journey” of their own - each new zone introduces tougher challenges and rarer materials. Early on, you’ll scavenge scrap and plant fiber to stay alive; later, you’ll hunt for exotic alloys in radioactive wastelands. And of course, there’s the ever-present Spice, Arrakis’s most famous export, waiting for those bold enough to refine it.
Pro Tip: Nothing is wasted on Arrakis. Even a corpse isn’t just a corpse - with the right tech, it becomes water, the most precious resource of all. Waste not, want not, as the Fremen might say.1 Before we dive into each tier of resources, remember: is an evolving live-service world. Resource locations can shift with in-game events (the Coriolis storms rearrange ore nodes weekly), and patches might re-balance yields. The info below reflects the state of the game a couple of months post-release - straight from first-hand play and community discoveries.
Tier 1: Starting Strong in the Basics
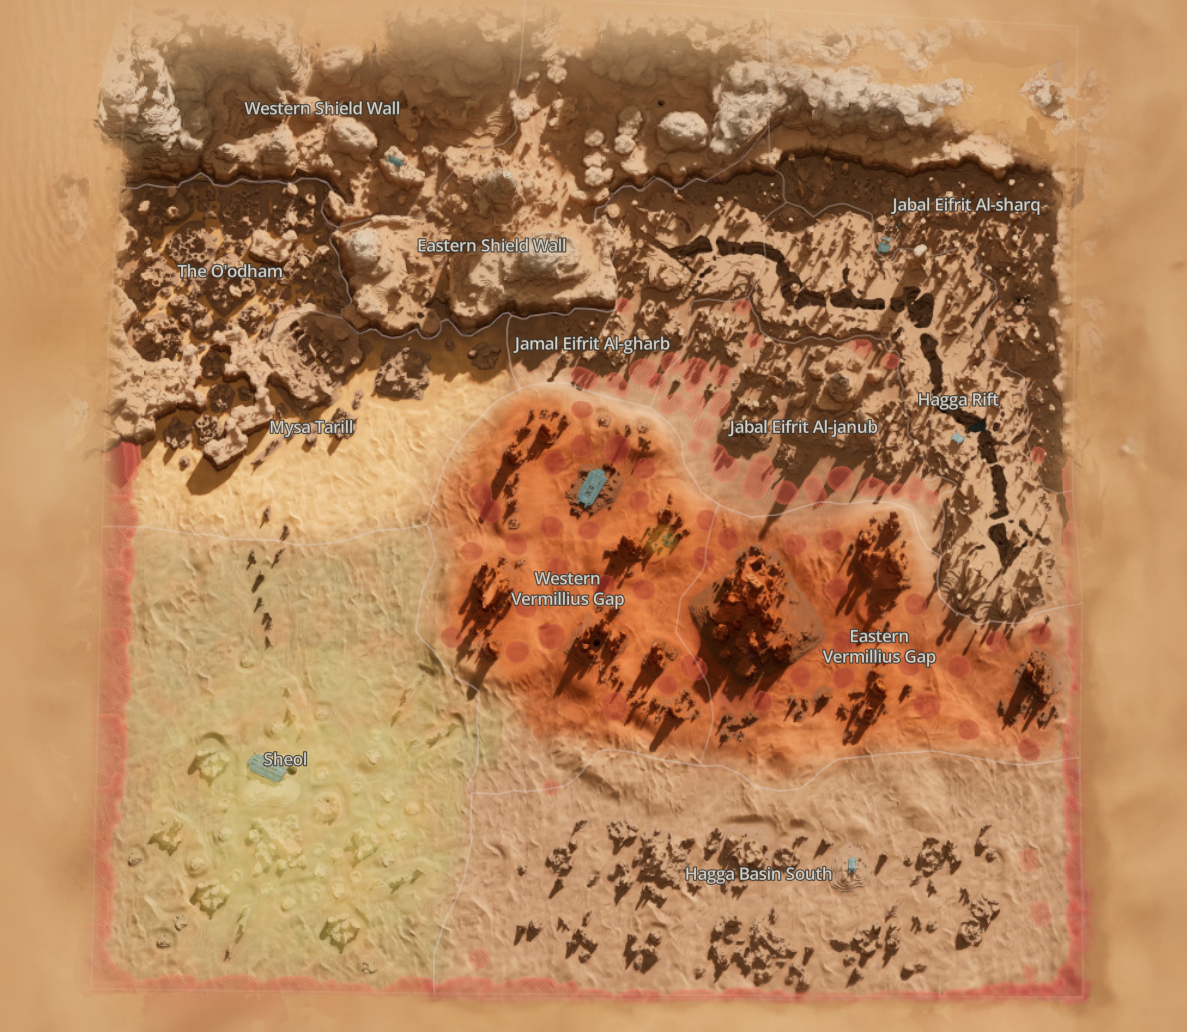
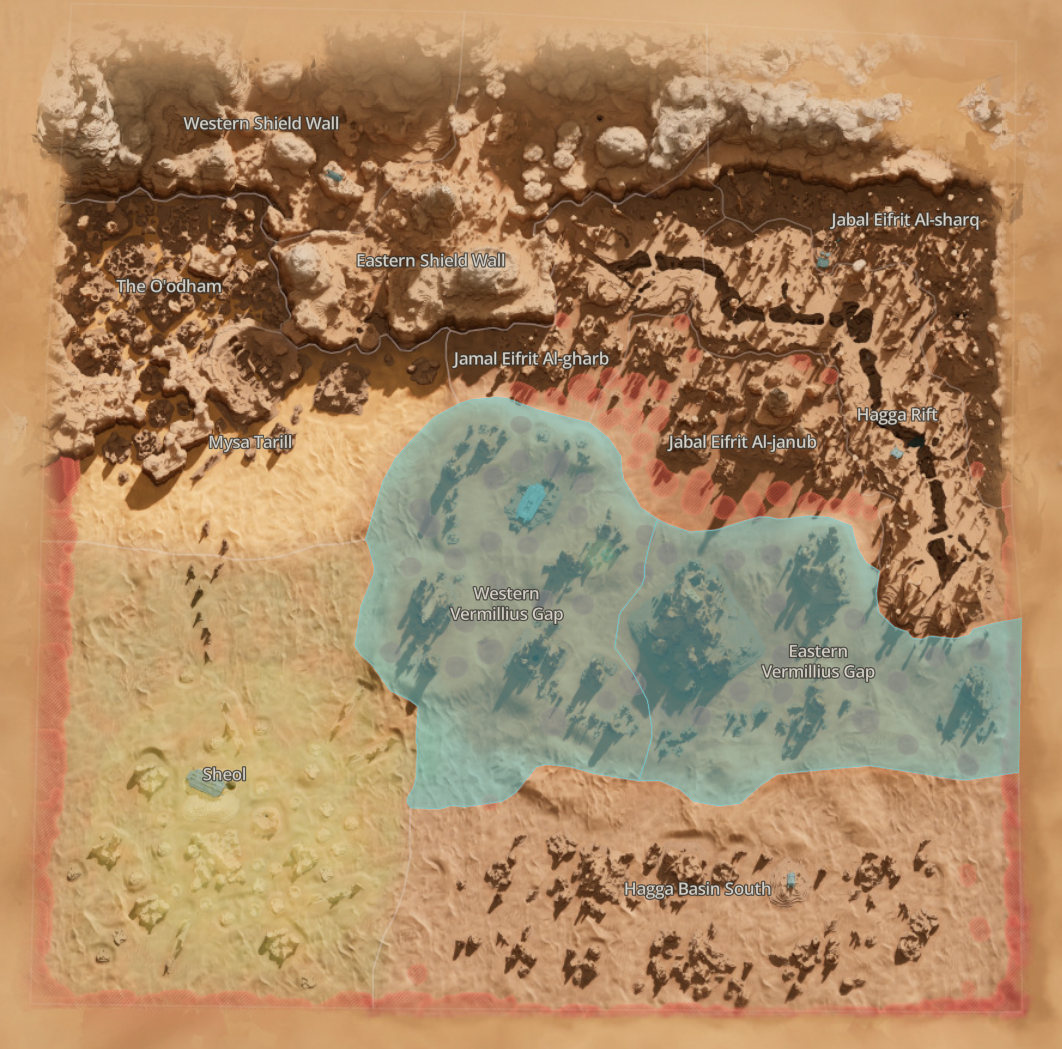
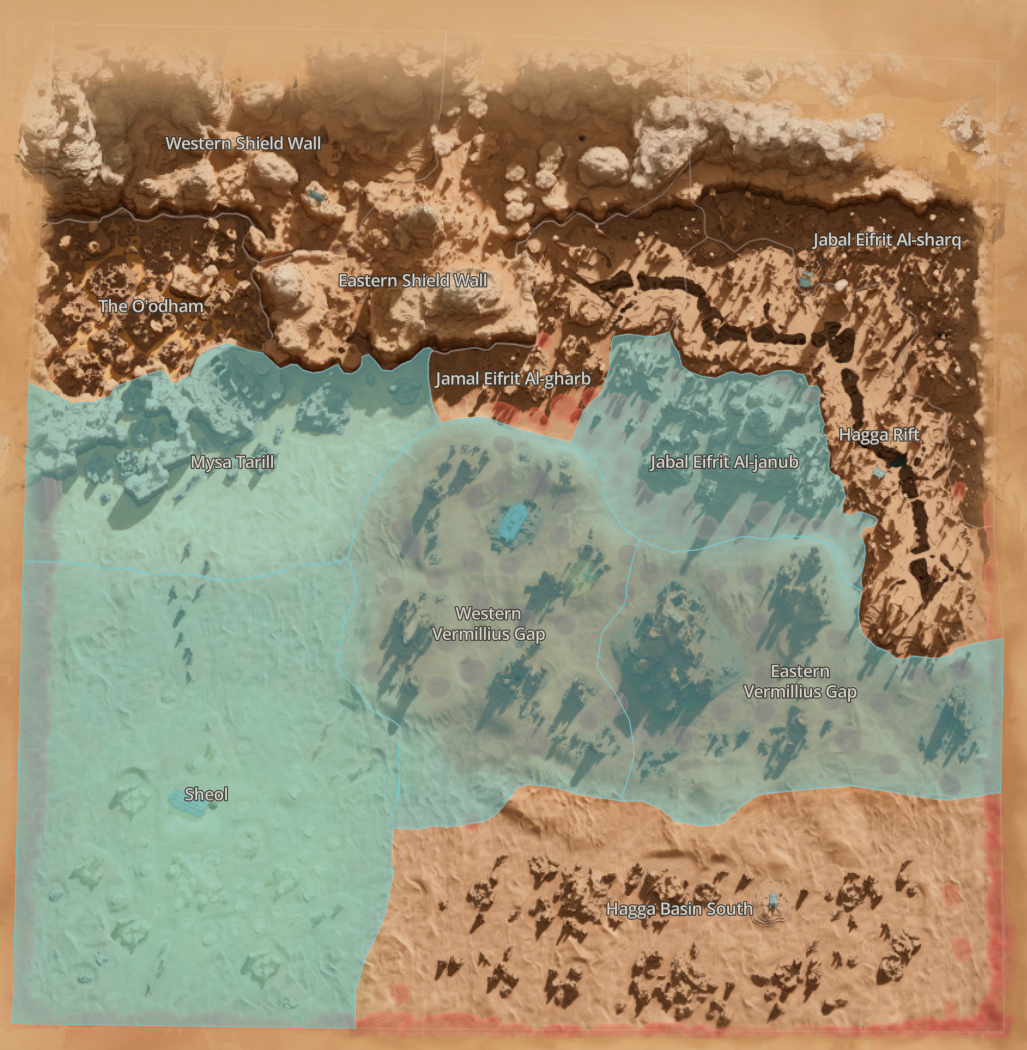
When you first drop onto the sands, you’re in the Tier 1 phase - essentially survival bootcamp. The Haga Basin’s gentle dunes and rock outcrops are littered with basic resources to kickstart your journey. At this stage, focus on stockpiling essentials and crafting your first tools and shelter. Here are the key Tier 1 resources and how to get them:
-
Copper Ore: The bread-and-butter metal of early crafting. Copper nodes are abundant in the starting zones of Haga Basin and can be mined easily with your starting cutter. Refine copper ore into Copper Ingots at an Ore Refinery to craft basic weapons, tools, and building pieces. Don’t leave the newbie area without a healthy stack of copper - you’ll need it for everything from your first knife to base foundations.
-
Salvaged Metal: Rusted scraps scavenged from wreckage and debris across the desert. You’ll find these scattered almost everywhere there’s signs of old battles or crashes, and you can recover them with a Cutteray tool. Salvaged metal is used for rudimentary metal items - think makeshift weapons, tool parts, and low-end base defenses. It’s basically free iron before you have iron. Grab all you see; you can refine or reuse it in multiple early recipes.
-
Granite Stone: Common stone chunks found on solid ground (anywhere that isn’t pure sand). Granite is “dirt-common,” showing up as you wander - just pick it up. Its purpose is straightforward: a basic building material for your first bases and crafting stations. In a world where sandstorms can level flimsy structures, having a pile of granite to shore up your walls is a literal lifesaver.
-
Plant Fiber: Scraggly desert bushes and hardy weeds yield plant fiber when harvested. You can gather fiber by hand all over the map wherever plants grow - even the harshest zones have the odd bit of scrub. Fiber might not sound glamorous, but it’s vital for early survival: you weave it into cloth for bandages and light armor. Before you find any fancy off-world medkits, a stash of plant fibers will keep you bandaged after those inevitable scuffles with raiders.
-
Fuel Cells: Small, cylindrical power cells that turn up in loot chests and on fallen enemies in the starting areas. At first, they’re more of a curiosity - you won’t have vehicles or generators until later - but hang on to them. Fuel Cells can be slotted into a base Fuel Generator to produce power, and at a Chemical Refinery you can even refine them into Vehicle Fuel Cells to gas up your future rides. In short, today’s random loot drop is tomorrow’s road trip fuel.
-
Actuators: You might loot Holtzman Actuators from early enemies or crates as well. These are mechanical components (named after the Holtzman tech from Dune lore) that you’ll eventually use for advanced gear. While you won’t craft anything complex in Tier 1 that needs actuators, start stockpiling them now. Think of actuators as the joints and pivots in machinery - they’ll come into play when you start building vehicles or certain high-end weapons.
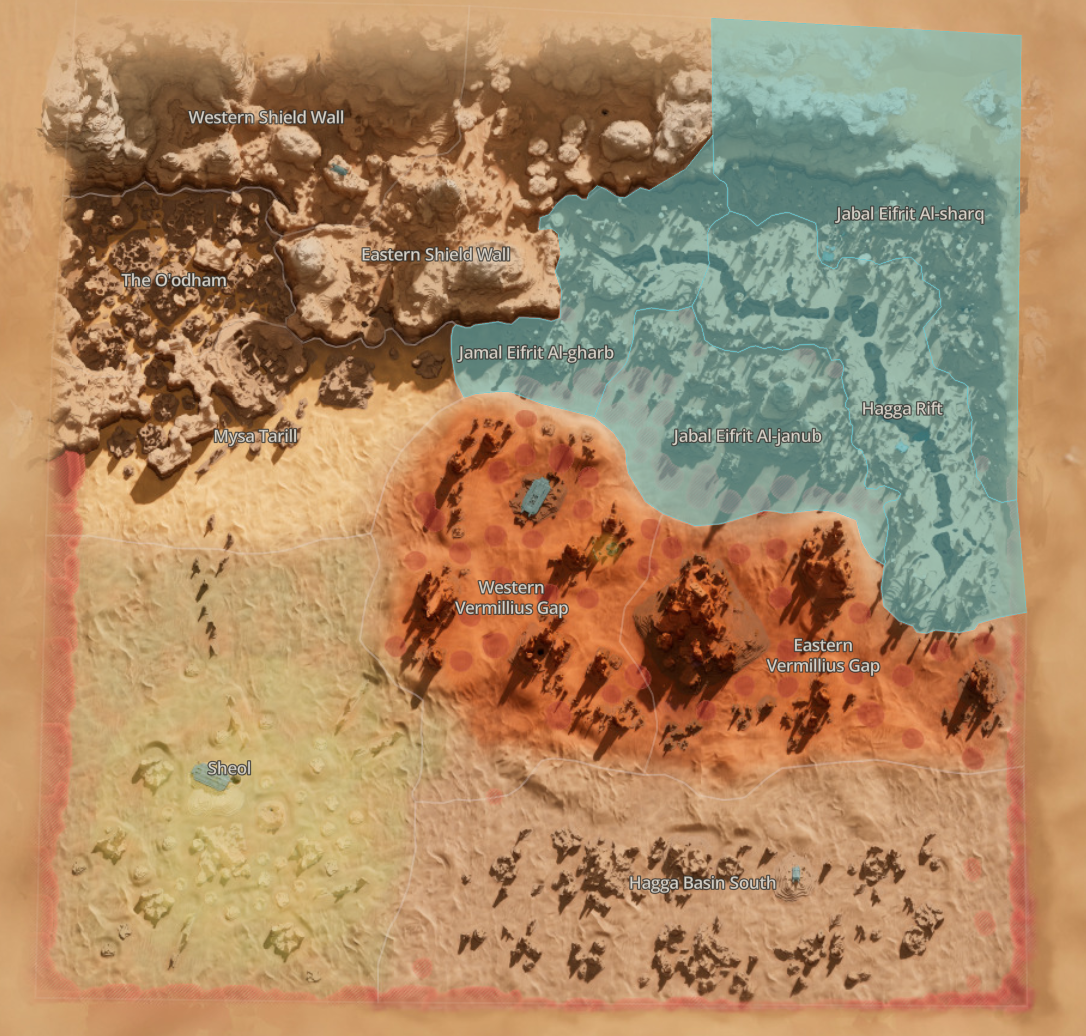
| Material | Where you’ll find it (map) |
|---|---|
| Copper Ore | Dense in Hagga Basin South (starter island); mine obvious copper nodes along rocky edges. |
| Salvaged Metal | Scavenger camps and early wrecks around Hagga Basin South; resets on camp/chest timers. |
| Granite Stone | Any rocky ground outcrops; mine granite lodes (visible brick-colored nodes). |
| Plant Fiber | Bushes around rocky areas across Hagga Basin South; very fast respawn loops. |
| Fuel Cells | Scavenger camps and containers in starter regions; also found as mineable “fuel cell ore.” |
| Holtzman Actuator | Broken Ornithopter wrecks (hand-mine) and basic chests; easy early farms after you spot downed ‘thopters. |
During Tier 1, your goal is to learn the ropes: gather a bit of everything, craft basic survival gear, and build a humble shelter. By the time you finish the tutorial and prepare to venture beyond the safe starting zone, you should have a knife, a ranged weapon, some armor, and maybe a dew collector for water. It’s a scrappy existence - copper blades and fiber cloaks - but it sets the stage for the industrial leap to come.
Editor’s Note: Don’t rush out of Tier 1 too fast. It’s tempting to sprint into the broader desert, but make sure you’ve crafted enough copper tools and fiber armor before moving on. A little preparation here prevents a lot of Fremen-style lamentations later (nobody wants to be caught in a dust storm with nothing but a loincloth and a prayer).
Once you’re geared up and have crossed the Vermilious Gap (the game’s way of saying “welcome to the real Arrakis”), you’ll land near a landmark called The Hammer. Now the true mining-and-crafting loop kicks into the next gear.
Tier 2: Iron, Silicon… and Early Industry
Tier 2 is where Dune: Awakening begins to feel like a proper industrial revolution. Copper tools give way to iron hardware, and your humble camp starts looking more like a base. In the orange-red sands around The Hammer (central Haga Basin), new resources appear - and they’ll vastly expand what you can build. Key Tier 2 resources include iron, “flour sand” for silicon, and a crucial component for vehicles:
-
Iron Ore: As you venture into Haga Basin’s rockier outcrops, iron ore nodes replace copper as the dominant metal. Use your upgraded cutter (you did craft one with all that copper, right?) to mine iron efficiently. Iron Ore refines into Iron Ingots, which unlock a world of possibilities: sturdier weapons, better armor, and the foundations of advanced crafting stations. In fact, iron becomes the backbone of Tier 2. You’ll need heaps of it to upgrade your base and craft the next tier of tools. Pro tip: iron nodes are often on cliffsides or canyon walls - don’t be afraid to climb a bit for those gray veins.
-
Flour Sand: Despite the name, this isn’t for baking Arrakis sourdough. Flour sand (fine white silica sand) gathers in dusty drifts, especially in worm-infested patches of the desert. You can harvest it by hand in a pinch, but it’s much more efficient with a Static Compactor - a specialized tool you unlock in Tier 2 (requires some iron ingots and an EMF generator to craft). Flour sand is valuable because you refine it in a Chemical Refinery into Silicone Blocks. Essentially, you’re creating silicon - a material needed for high-tech gadgets and structures (imagine things like circuit boards or advanced building materials). If copper and iron are the Iron Age, silicon propels you into the Electronic Age. Just watch your back while shoveling sand; where there’s flour sand, there are often sandworms.
-
Complex Machinery: Now we’re talking real tech. Complex Machinery is a catch-all term for the advanced mechanical parts you’ll need to build vehicles and certain high-end workbenches. These don’t come from mining rocks or picking plants; instead, you loot complex machinery from special facilities. In Haga Basin, two derelict industrial sites - the Northwest and Southeast Iron Works - are your go-to spots. These scaffolded structures are crawling with NPC enemies, but the effort is worth it: fight your way to the top, snag a key, power up the generator, and you can loot multiple containers, each coughing up 10-20 pieces of complex machinery per run. The respawn is quick, meaning you can farm these repeatedly. Complex machinery is essential for vehicles - without it, you’re not building your first buggy. So, if you dream of cruising the dunes instead of walking, grab all the gears, circuits, and widgets you can carry from these places.
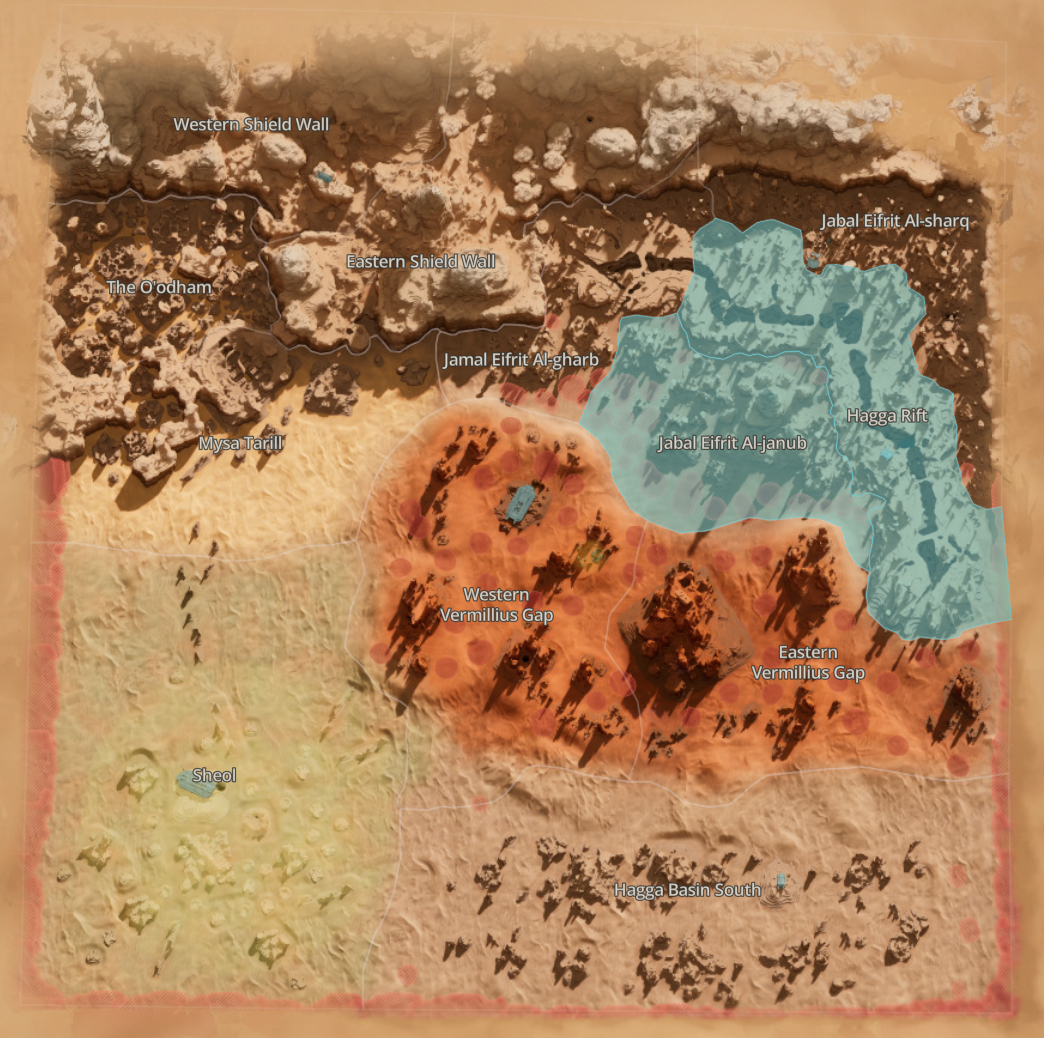
| Material | Where you’ll find it (map) |
|---|---|
| Iron Ore | Eastern & Western Vermillius Gap, directly north of the starter zone; mine with Cutteray Mk1+. |
| Flour Sand (→ Silicon Blocks) | Vermillius Gap white dust clouds; safest spots on outer edges/among rocks; use Static Compactor. |
| Complex Machinery | Ironworks POIs: Southwest (W. Vermillius Gap) & Southeast (E. Vermillius Gap). Loot multi-floor chests. |
With iron weapons in hand and some machinery in your pack, Tier 2 is also when you’ll likely attempt to build your first vehicle (the modest but life-saving buggy) and more advanced base facilities. You’re stepping out of the primitive age. Enjoy the moment when you first drive a cobbled-together rover across the sands - just don’t run out of those fuel cells!
Tip: Prioritize a Static Compactor as soon as you have the iron for it. Flour sand by hand is a slog, and you risk becoming worm food while digging slowly. The compactor lets you suck up sand fast, and you’ll need a ton of silicone later for electronics. Think of it as investing a little iron now to save a lot of time (and lives) later.
By the end of Tier 2, you should have a solid foothold: a multi-room base, maybe a garage with a buggy, iron weapons, and the ability to produce silicon and mechanical parts. Now, as you push into the Tier 3 zones (the Hoga Rift, with eerie blue sands), the game demands you up your technological game once again.
Tier 3: Steel, Cobalt, and High-Tech Components
Tier 3 is where Arrakis really separates the veterans from the newbies. The Hoga Rift region - characterized by blue-tinted sands and dark canyons - contains resources that fuel a miniature technological revolution: the invention of steel, the creation of advanced electronics, and the accumulation of parts for large structures. Here’s what you’ll be hunting in Tier 3:
-
Carbon Ore (for Steel): Pure iron was great, but to take the next leap, you need steel. Enter carbon ore - a resource found all over the blue sand areas of Hoga Rift. Carbon ore looks like black or dark gray deposits, often in canyon walls. On its own it’s not very useful, but when combined with Iron Ingots in any Ore Refinery, it produces Steel Ingots. Steel is the backbone of Tier 3 gear and base upgrades. With steel, you’ll craft tougher armor, stronger base structures (think reinforced walls, turret parts), and better tools. Essentially, carbon is the ingredient that lets you transcend the iron age. Collect it in bulk - every piece of steel requires a chunk of carbon and some iron. The good news is Hoga Rift is rich in carbon nodes; the bad news is it’s also more dangerous territory.
-
Erythrite Crystals (for Cobalt Paste): Scattered in the dark recesses of Hoga Rift are glowing pink crystal formations - Erythrite. These crystals are striking and not too hard to find (one hotspot is Mineral Extraction Facility 6 near Abernath’s Descent, yielding a dozen+ nodes). What do you do with pretty pink rocks? You grind them into Cobalt Paste. Using a Chemical Refinery (and a bit of water as a reagent), erythrite crystals are refined into cobalt paste. This paste is crucial for many advanced recipes - it serves as a high-grade chemical component in crafting (imagine needing it for advanced ammo, battery cells, or armor linings). If steel is your structural material, cobalt paste is your advanced chemical catalyst. Pro tip: some erythrite nodes lie in low-level radioactive zones in the Rift. The radiation is mild (you can manage without a suit for short periods), but keep an eye on your Geiger counter and don’t linger too long.
-
Calibrated Servoks: By now you’ve probably used some basic servos and actuators, but Tier 3 introduces Calibrated Servoks - essentially calibrated servo-mechanisms needed in large quantities for constructing advanced structures (turrets, refinery upgrades, etc.). Oddly, you won’t efficiently farm these from mining or regular chests. Instead, hit the big landmark camps. Notably, targets like KD’s Shadow and K’s Tower in Hoga Rift are treasure troves: clearing these massive enemy strongholds can net you 100+ servoks in one go from their combined loot. Smaller “barracks” outposts on the Rift edges yield a dozen or two at a time. In short, if you need servok parts, go raiding. These components are used in almost every high-end building project - without a stockpile of servoks, you can’t erect advanced defenses or upgrade your base to its Tier 4 glory.
-
Ray Amplifiers: As the name hints, these are high-tech gadgets - lens and crystal assemblies that amplify beams (think laser weapons or cutter enhancements). In gameplay terms, ray amplifiers drop from mid-tier enemy caches and camps - similar places you find servoks. They tend to piggyback on the same loot tables in barracks or tech facility chests, often in Hoga Rift enemy areas. Ray amplifiers are used for certain weapon upgrades and vehicle attachments. For example, there’s talk of a “cutaway” attachment for buggies and better energy weapons that require these amplifiers. If you intend to arm yourself with energy-based weaponry (lasguns, perhaps) or beef up your vehicle with fancy gear, start collecting ray amplifiers now.
-
Range Finders: These handy devices are basically enhanced scopes or optical sensors. You won’t mine a range finder; you’ll get them as drops from specific enemies - the sharpshooters. In Hoga Rift, watch out for humanoid NPCs with flickering scope glints who fire at you from long range. Take them down, and you can loot range finders. They are key components for crafting precision firearms (sniper rifles, perhaps) and possibly for base defense systems that require targeting optics. In short, kill snipers to get better at sniping, a poetic little loop.
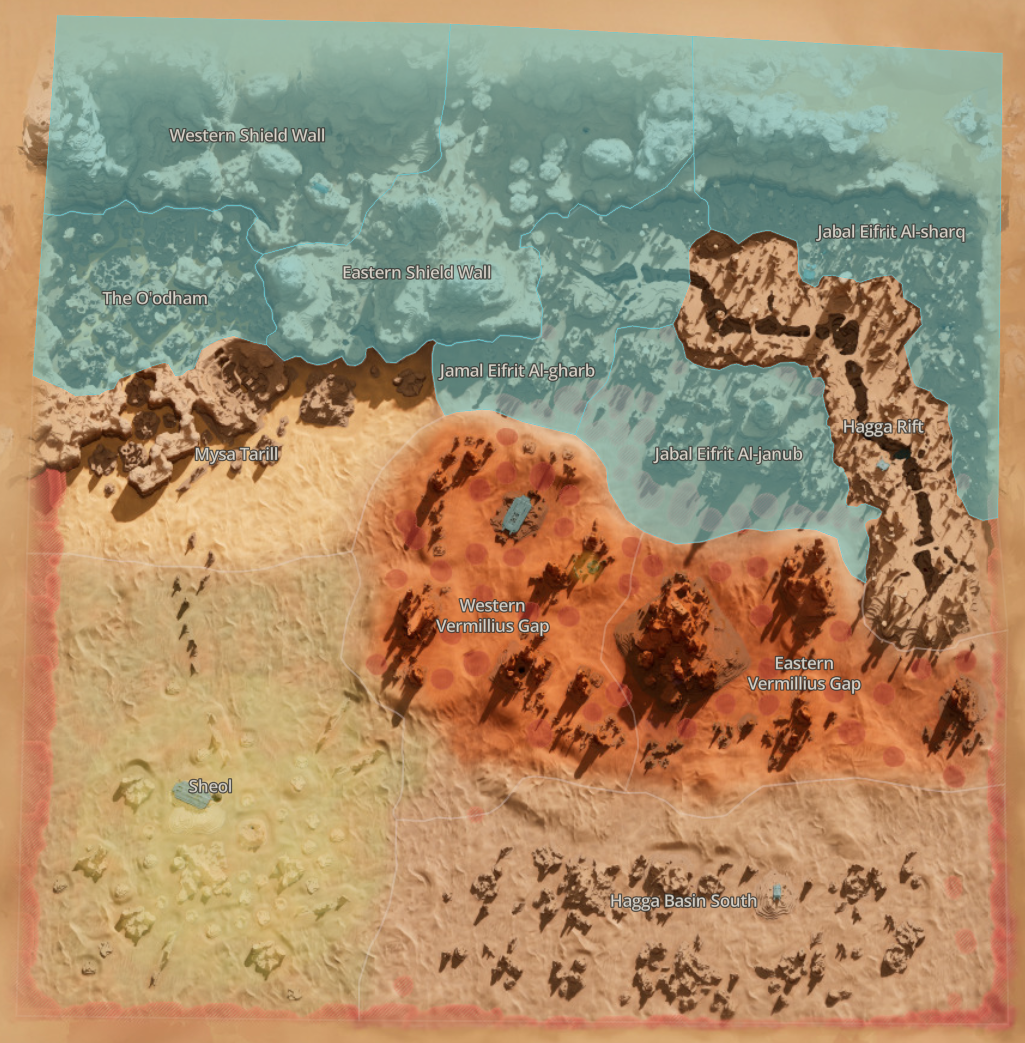
| Material | Where you’ll find it (map) |
|---|---|
| Carbon Ore (for Steel) | Hagga Rift blue-sand canyons and walls; mine abundant carbon to smelt with iron. |
| Erythrite Crystal (→ Cobalt Paste) | Hagga Rift-especially underground CHOAM Mineral Extraction Facilities and entrances |
| Calibrated Servok | Jabal Eifrit bandit strongholds (e.g., Khidr’s Shadow/Kant’s Tower) chests in large quantities. |
| Ray Amplifier | Common in Rift/Eifrit tech caches & outposts alongside other weapon components. |
| Range Finder | Drops from sniper NPCs-farm at CHOAM facilities in Hagga Rift or Piter’s Net (Jabal Eifrit Al-gharb). |
Tier 3 is a busy stage. You’re juggling mining runs for carbon and crystals, combat raids for servoks and electronics, all while fending off more dangerous foes (and maybe the occasional PvP ambush, since the stakes are higher out here). But once you’ve amassed a healthy amount of steel and cobalt, and upgraded your base and arsenal, you’ll be ready to push into the even harsher zones beyond the Shield Wall. Tier 4 awaits, and with it, the promise of flight - if you can secure the right resources.
Strategic Note: Consider building your main base near the Hoga Rift entrance once you hit Tier 3. Being adjacent to the Rift means shorter trips when farming carbon and erythrite (for steel and cobalt). This proximity can save you hours of travel time. Plus, if you plan to stockpile servoks from KD’s Shadow or K’s Tower, you’ll want a safe stash nearby. Just be sure to fortify - the Rift’s edges can get spicy with roaming enemies.
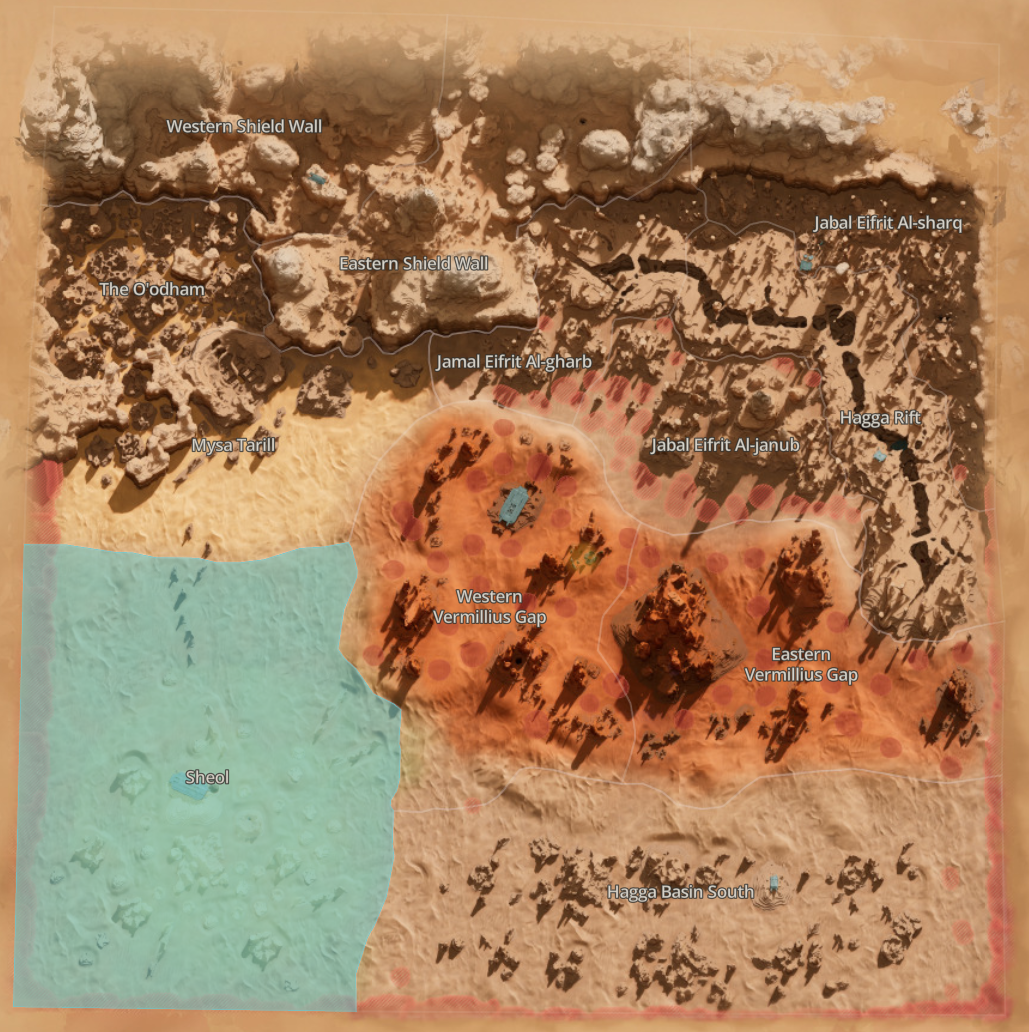
Tier 4: Aluminum Age and the Rise of Industry
Crossing into Tier 4 content feels like stepping into an Arrakeen factory - the scale of industry ramps up dramatically. The Eastern part of the map, around the Shield Wall and beyond, is where Aluminum enters the scene along with a suite of industrial components. Tier 4 is also when you likely gain the ability to fly an Ornithopter, the iconic Dune aircraft - but assembling one will require some of these very resources. Here are the major Tier 4 resources and how to get them:
-
Aluminum Ore: The next big metal after iron/steel. Aluminum nodes are densely concentrated along the Shield Wall region (the massive cliff range). They appear as lighter-colored metallic veins in rock. You’ll find plenty at ground level (great for zooming around with your buggy and mining quickly) and more if you climb atop the rocks. A word of caution: the Coriolis Storm that periodically ravages Arrakis will reshuffle resource node locations weekly. That means your favorite aluminum farming spot might dry up after a storm - keep your Ornithopter’s scanners handy to find new deposits post-storm. Aluminum Ore must be refined (at a Medium Refinery) into Aluminum Ingots. Those ingots unlock high-tier crafting: mid-tech weapons, base structures like improved power generators, and components for vehicles. In fact, you’ll need aluminum for something huge in Tier 5 - crafting Duraluminum, an advanced alloy, so start hoarding those silvery rocks now.
-
Industrial Pumps: These hefty devices are basically heavy-duty water or chemical pumps, and fittingly, they’re found in what amounts to a small industrial dungeon. The best way to get pumps is to raid Sentinel City - a massive rock formation outpost in the Shield Wall area. Sentinel City is crawling with Sandflies (NPC scavengers) using these pumps, and clearing the area yields about 18-30 Industrial Pumps per run. Not bad for a half-hour excursion. Pumps can also drop in crashed ships or other dungeon chests, but Sentinel City is the most reliable farm. Now, why do you care about pumps? Because they’re used in a ton of high-end crafting. For one, pumps are needed in the assembly of Ornithopters (the flying vehicles) and in advanced base facilities (water treatment, etc.). They’re even listed in crafting recipes for tools like the Industrial Dew Collector Mk4 and large water storage. On Arrakis, water is life - and pumps are how you move that life around. So, if you plan on flying or building a self-sustaining base, get pumping.
-
Compressors (Light & Heavy Caliber): Ever wonder how people pack a punch in their firearms or machinery? Compressors are the answer. In Tier 4, you’ll find Light Caliber and Heavy Caliber Compressors mainly as drops alongside pumps. Sentinel City’s loot chests often contain these as well. These components are used for crafting advanced weapons - essentially functioning as improved barrels or recoil systems for guns. A heavy caliber compressor might be needed for that big rotary cannon you’ve been eyeing, while light compressors could upgrade a precision rifle. They might also play a role in vehicle weapon attachments. While you’ll naturally accumulate some compressors while farming pumps, keep an eye out - if RNG doesn’t favor you, consider trading with other players or checking vendors (sometimes high-level gear vendors sell compressors for a hefty sum of Solari). In short, compressors let you handle bigger booms.
-
Diamondine Dust: A rare, sparkly powder - and one of the most valuable finds in Tier 4. Diamondine dust is primarily farmed in an area called Misseril, an electrified worm-zone not far from the Shield Wall. Clearing enemy camps and chests in Misseril can net you a good amount of dust (and some Carbide Scraps, which we’ll get to next). You can also find hidden caches on rooftops or corpses with diamondine dust if you explore carefully. Another method: players report a route in Mysa Tarill (southwest of Eastern Shield Wall) where several chests consistently drop diamondine dust. Why all the fuss about this dust? Because Diamondine Dust is required to build your Ornithopter - that’s right, the dream of flight runs on powdered “diamonds.” It’s also used in some top-tier weapon schematics (anything that needs superhard materials, like special blades). If you want to take to the skies, you’ll likely need a stash of diamondine. Pro tip: Many players farm the dust rather than buying it, but if you’re rich in Solari, some NPC vendors (like certain weapons dealers) will sell Diamondine Dust for a steep price (~3,500 Solari each).
-
Carbide Scraps: Alongside diamondine in those tough Tier 4 zones, you’ll collect carbide scraps. These are fragments of extremely durable alloy - think tungsten-carbide shrapnel. Carbide scraps drop from chests in worm zone camps (like Misseril) and occasionally from big creature kills. They serve as advanced crafting material for high-end gear, especially blades and armor plating. For example, to craft certain Mk5 melee weapons or reinforced vehicle parts, you might need a bunch of carbide. Essentially, carbide scraps are what you use when regular steel just isn’t tough enough. Hold onto them; even if you don’t craft immediately, they trade well because every endgame crafter needs a pile.
-
Insulated Fabric: Last but not least in Tier 4, the textile tech gets an upgrade. Insulated fabric is a crafted material you’ll start to see as drops in specific areas (Mendex Hole above Testing Station 163 is a goldmine for it). This vertical cave requires some climbing and grappling, but yields dozens of insulated fabric pieces per full clear. Insulated fabric is used to craft high-end protective gear - notably the famous Stillsuits (for water recycling) and other survival suits. It’s basically high-tech cloth with cooling and heat-distribution properties. If you plan on venturing into extreme environments (radiation zones, deep desert, etc.), crafting a better suit or armor mod might require insulated fabric. Also, note that Mendex Hole’s chests can drop Stillsuit Tubing and Sandtrout Leather alongside the fabric - components also related to water retention suits. While many players eventually opt for heavy combat armor (preferring firepower over water saving in PvP), don’t underestimate the value of a well-made stillsuit for PvE exploration. In any case, farm some insulated fabric so you have the option.
Tier 4 is arguably the turning point of Dune: Awakening. With aluminum and industrial parts, you are no longer surviving - you’re thriving. This is the stage where your base likely gets electricity humming, your Windtraps (automated water collectors) are running with advanced filters, and you might even have your first Ornithopter constructed to survey the sands from above. The gameplay opens up vertically (literally) once you have a flyer. Just remember to maintain it - an Ornithopter needs fuel and occasional repairs, which circle back to earlier resources (fuel cells, spare parts). Good thing you saved those, right?
Expert Insight: The moment you craft your Ornithopter, the game changes. But don’t neglect your groundwork. Keep running Sentinel City and Misseril in a loop for pumps, compressors, dust, and scraps even after you get the ‘thopter. You’ll need extra for future upgrades (bigger wings, better engines) and you might even sell or trade surplus to other players. An Ornithopter pilot with no resources is just an easy target in the sky - stock up so you can stay airborne and armed.
Now, steel yourself (pun intended) and don your radiation gear: Tier 5 is up next, and it’s bringing the literal heat (and radioactivity). Time to talk about the spice… If earlier tiers were about basic survival and industrialization, Tier 5 is about . You’re entering the late-game now, delving into radioactive zones and unlocking the secrets of the Spice. The southwestern reaches of Haga Basin (often called the ) and certain become focal points. The key resources in Tier 5 include a new alloy (duraluminum), advanced power components, and Spice itself in its refined form:
Tier 5: The Spice Must Flow - Duraluminum & Spice Refining
-
Jasmium Crystals (for Duraluminum): The radiated zone of Arrakis hides a new ore - Jasmium - which looks like a green, luminescent crystal growing in toxic goo pools. Mining Jasmium is one of the more perilous activities in the game: the areas are highly radioactive, worm-infested, and generally unpleasant. Always wear a radiation suit (unprotected exposure will kill you in moments). Jasmium typically spawns in and around pools of glowing green liquid. To farm it safely, use your Ornithopter to land on the edge of pools or even as a floating platform, and consider a Suspenser Belt to hover above the goo while mining. If your rad meter climbs, pull out and let it reset before diving back in. Now, why suffer this? Because Jasmium combined with Aluminum Ingots produces Duraluminum Ingots - a high-strength alloy needed for top-tier constructions. Duraluminum (a nod to a classic aerospace alloy) is critical for building the Spice Refinery and crafting Tier 5+ gear. Essentially, it’s the gateway material to endgame content. Stockpile some aluminum before you head into the zone, so once you haul back Jasmium, you can immediately fire up the Medium Refinery and smelt your Duraluminum.
-
Military Power Regulators & Hydraulic Pistons: These two components go hand-in-hand as the guts of advanced machinery (think of them as the power management units and heavy actuators of endgame devices). Your best bet to acquire both is to raid the Edge of Acheron outpost. This is a PvP-flagged zone, meaning other players might be gunning for you as much as the NPCs. If you clear out Acheron’s three big chests, you’re usually rewarded with multiple Military Power Regulators and Hydraulic Pistons in one go. These are used in crafting top-tier vehicles and structures - for instance, late-game combat vehicles or large base defenses often require regulators (to handle high power loads) and pistons (for heavy moving parts). There are even “Tri-forged” versions of the pistons for ultimate-tier gear. If you’re not into PvP risk, regulators and pistons can drop from other high-level chests or be bought from player auctions, but Acheron is the most efficient farm. Just watch your back; being overloaded with these precious parts makes you a tempting target in a PvP zone.
-
Spice Sand & Spice Melange: Finally, the namesake of Dune - the Spice. Up until now, you might have seen Spice Blow events: geysers of Spice Sand erupting from the desert, drawing everyone’s attention. In Tier 5, it’s time to capitalize on them. Spice Sand can be harvested at blow sites (just be quick, or the sandworm will come to devour everything, you included). Before Tier 5, you could sell unrefined Spice or use it sparingly, but now you can refine it. Building a Spice Refinery (requires Duraluminum) lets you process spice sand into Spice Melange. This is a huge milestone: Melange is the final refined product, valuable to the Imperium and vital in high-tier crafting. In-game, refined Spice is used in Tier 5 and 6 crafting recipes, making it critical for your endgame gear. For example, some advanced stimulants, faction rewards, or even construction projects might demand Spice. Refining also produces Spice Residue as a byproduct, which isn’t trash - it has its own uses in crafting, possibly for more experimental items. To maximize your haul, upgrade your refinery when possible (higher-tier refineries convert more sand into melange efficiently). Remember the mantra: “He who controls the spice controls the universe.” Well, at least he controls the late-game crafting economy.
Tier 5 often coincides with big narrative strides (if you’re following any story or faction arcs) and truly formidable foes. You’ll likely be tangling with faction-trained troops or deadly sandworms while chasing these resources. But once you get your duraluminum production going and spice flowing, you’re on the doorstep of Tier 6 - the point where you leave Haga Basin entirely and brave the legendary Deep Desert.
Warning: At this stage, never enter the radiated Jasmium fields without protection. It sounds obvious, but excitement can make even veterans sloppy. One misstep into a goo pool without a rad suit and you’ll drop faster than you can say “Muad’Dib.” Instead, use the tips from the Fremen playbook: land on rock outcrops or use hovering tech to mine safely. The difference between a rich haul and a tragic death at Tier 5 is all in the preparation.
Tier 6: Beyond the Shield Wall - Plastanium and Deep Desert Riches
So you’ve made it this far - armed with steel, powered by spice, maybe even ruling a small corner of Arrakis. Tier 6 is the current pinnacle of Dune: Awakening’s resource game, pushing you into the Deep Desert beyond the known map (northwest of Haga Basin). This is endgame territory: nearly everything is PvP-flagged, resources are ultra-rare, and venturing out unprepared is a death sentence. But the rewards? Potentially game-changing. Key Tier 6 resources and how to obtain them include:
-
Stravidium & Titanium (for Plastanium): The Deep Desert introduces two new raw materials: Stravidium Mass and Titanium Ore, often found at lonely rock formations in the vast sands. These are the ingredients for Plastanium, an advanced alloy (essentially futuristic plasteel). Plastanium is to Tier 6 what steel was to Tier 3 - the material for top-tier armor, weapons, and structures. To craft Plastanium Ingots, you’ll need to refine titanium and stravidium together (likely at an advanced refinery). Stravidium tends to spawn deeper in the grid (players noted hex F8 on the Deep Desert map as particularly rich in stravidium nodes), while titanium is also scattered about. Reaching these nodes requires an Ornithopter - you have to physically fly to the edge of Haga Basin, then use the world map to zone into the Deep Desert. Once there, be ready for long travel; the Deep Desert is a 9x9 grid of pain, and fuel is a limiting factor (bring multiple large fuel cells for your vehicle). Harvest as much as you safely can carry, and watch out for other players - PvP is the norm out here beyond Row A of the grid (the only somewhat safe zone). With a haul of titanium and stravidium, head home and smelt that Plastanium. You’ll need it for the absolute best gear in the game - think power armor, high-end weapons, fortress-level base upgrades, you name it.
-
Advanced Servoks & Fluid-Optimized Pumps: Surprisingly, even at Tier 6 you’re still looking for better versions of familiar components. Advanced Servoks (sometimes called Advanced Servos) are needed for the final tier of structures and weapons, and Fluid-Optimized Industrial Pumps for the biggest facilities. But you won’t mine these; you’ll scavenge them from wrecks and dungeons. Particularly, keep an eye out for Crashed Ships half-buried in the sand. These shipwrecks, when pried open (usually by cutting through panels or hacking doors), often yield caches of high-tier machinery: expect to loot things like advanced servoks, fluid-efficient pumps, and other Tier 6 components. Essentially, the desert’s lost technology becomes your treasure. There’s also the prospect of Landsraad Air Drops or supply crates in PvP zones that can contain these items. If you’ve got friends, consider going in a group - one watches for hostile players while others loot.
-
Blade Parts & Other Treasure: Combat at Tier 6 isn’t just about guns - the best melee weapons require special Blade Parts. These, along with other composite parts and plastanium plates, can be found via Buried Treasure mechanics. Yes, Arrakis has literal buried treasure: use your scanner on open sand to find hints (little markers), then deploy a compactor or digger to unearth chests. These chests can drop Plasteel Composite components, Blade Parts, Advanced Machinery, and other goodies for Tier 6 crafting. Often, the richest treasure appears in so-called quicksand areas - risky to traverse but more rewarding. It’s an Indiana Jones style gamble: brave the traps for the big prize. Blade parts from these finds are needed for crafting legendary melee weapons (nothing says “Fremen zeal” like a crafted crysknife from rare alloys).
-
Spice & Special Events: The Deep Desert isn’t all static spawns. Spice Plumes out here can be gigantic; if you see a colossal spice blow (“Granddaddy plume”), know that it will attract organized groups (and PvP conflict). Solo players should target smaller plumes - you can land, compact the spice quickly, and get out before getting noticed. Additionally, there are unique Dungeons and Testing Stations in the deep desert, teeming with ultra-lethal enemies that can drop unique loot. The guide for newcomers: avoid these initially. Get your Tier 6 gear crafted first, then tackle them. The deep desert tests not just your gear but your planning: come with extra fuel, repair materials (welding wires, etc.), water (there’s no dew out there), and emergency escape options. This is the final exam of resourcefulness.
Tier 6 wraps up the current progression in Dune: Awakening. If you’ve reached this point, you’ve effectively gone from a robed desert urchin scrounging copper to a power-armored titan commanding plasteel and spice. The journey is immense, but so is the satisfaction when you look at a stockpile of plastanium and recall when granite rocks were a big deal to you.
Survival Tip: In the Deep Desert, travel light and smart. Carry only what you need to gather and survive - leave room for the riches you’ll collect. If you get killed out there, you risk losing everything on you, including those hard-won stravidium stacks. Many veterans adopt a “vulture strategy”: fly in, grab resources or loot quickly, and fly out without lingering for fights. There’s no shame in being a hit-and-run scavenger in Tier 6; in fact, it’s the smart way to play when a single misstep could set you back hours.
Conclusion: From Scavenger to Desert Power
Tracking down every resource in Dune: Awakening is a monumental task - one that mirrors the rise of Paul Atreides himself (from struggling in the desert to mastering the Spice). As a player, you’ll feel a similar arc of growth. Early on, a handful of plant fiber and salvaged metal means survival; later, you’ll command duraluminum and plastanium to bend the sands to your will. The game’s design cleverly ensures that by the time you get to a new tier of resources, you understand why you need them - each tier unlocks new abilities, vehicles, or structures that make the dangers of Arrakis a bit more manageable.
To recap the highlights: Copper and basics get you on your feet. Iron and complex machinery start your engines (literally). Steel and cobalt build your mid-game power base. Aluminum and industrial tech give you the tools to conquer the skies. Duraluminum and Spice open the door to the highest echelons of gear and the broader Dune economy. And plastanium and deep desert loot crown you as a master of Arrakis’s harshest landscapes.
One of the beautiful (and at times frustrating) things about Dune: Awakening is how it makes you earn each step. You’ll appreciate your first buggy ride after hoofing it for hours. You’ll cherish an Ornithopter flight after sweating through ambushes to collect diamondine dust. By the end, “Desert Power” isn’t just a phrase - it’s something you’ve achieved through grit and savvy resource management.
So, whether you’re a new survivor looking at a copper rock or a clan leader surveying spice fields from on high, remember that knowledge is the greatest resource of all. Hopefully, this guide has given you the knowledge to find the rest. Now get out there and mind the worms - they like to guard the good stuff. Good luck on Arrakis, and may your cache always overflow (and your water meter never run dry)!
Footnotes
-
The Deathstill, a structure you can build, extracts water from corpses - a grim but lore-accurate nod to Fremen survival methods. ↩
Gallery